Today I have to talk about Inkscape. It's nothing new. But it is free. Inkscape, in short is a program mostly used for converting PDF and other files into SVG files. I use Sure Cuts A Lot, (another AMAZING program, but that's far from free!) and I need SVG files for that program. Ok, I realize this post wont interest everyone, but for those that use SCAL or Inkscape, maybe you'll find this helpful. (PS - anyone could download Inkscape. Even if you don't have a "need" for it, it is a really fun graphics program to play around with)
My biggest issue was that I was not able to actually fully convert my files. Sure you can open them up, and then you click 'save as', change the file extension in the drop down menu, hit ok and BOOM you have an SVG file. Wrong. I would quickly learn that when I went to SCAL (Sure Cuts A Lot) and imported my new SVG file, all I got was a blank box.
Now I'm no pro at this, in fact far from it. So I doubt I will use the proper terminology. But maybe that's good. I will just explain these things as best I know how. For the example, I will use a basic sun I found online that I want to cut out with my cricut later.
First, obviously open up Inkscape. Click 'File' ~ 'Open' ~ (locate file on your hard drive) 'Open'. I get a box that pops up that says: "Link or Embed image" and then explains the difference. I always chose embed.
At this point you will see your graphic on the page. You are just a few short clicks away from a finished SVG image you can use in SCAL or where ever you need it. You need to select this image. So simply click on it and a box with arrows around it will show up.
Next, you need to click on the 'Path' menu at the top of the screen. Go down until you see 'trace bitmap....'
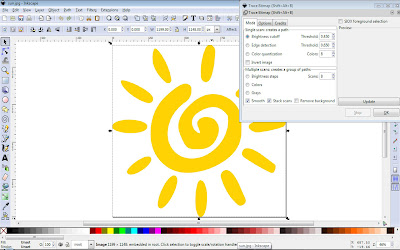
Ok, so third step. The "Trace Bitmap" box will pop up. It has a ton of options in it. And I can't exactly tell you what they all mean. Until I figured this out, I scoured the web for tutorials. I'm not great with You Tube videos, (and honestly I don't always trust them anyway) and I found this tutorial. It's not great, but it's how MY tutorial here was born! :)
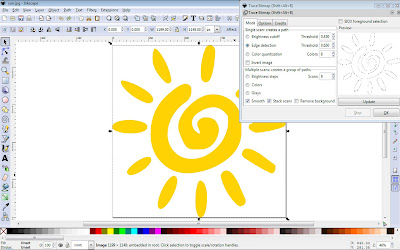
Like I said, I just had to play around with these options. One site I checked out first said to just keep hitting 'update' until your image shows up in the box. Don't do that. You'll be clicking until your computer dies and nothing will ever show up there. I say if after two or three clicks max, nothing has changed, you need to start trying different combos of the options. For this example, the one that ended up working for me was to select 'edge detection' I tried changing the threshold numbers, but the changes it made were not substantial enough for me to decide it mattered. So click 'edge detection' ~ 'update'. Your image should show up in a black and white outline, like you see below.
If you wanted to copy the image in color, you need to select 'Colors' on the bottom set of options. The "paths" is set to a default of 8. I have not yet played around with the different paths so I have not changed this number yet. I suspect it will be similar to Photoshop and layers. Whenever you change something, like going from black and white outline, to a full on color image, you need to hit update.
After deciding which one you want, click 'Ok'. For the remainder of this tutorial, I will proceed with only black and white. (Reason being, if you cut this out on a cricut or silhouette, you would chose the color with your paper - you could have a hot pink sun. And the image is easier to work with in my opinion, in black and white.)
Once you click ok, the box does not disappear. But you should notice that your image has a darker outline around it.
Now you can click the red X in the upper right hand corner of the 'trace bitmap' box. You have to drag your new outline off of the color image for the next part.
Go back and select the colored image now. Once the box is around the color sun, hit delete. Move your black and white image back to the "page".
Last step! Click 'file' ~ 'save as' Make sure the drop down menu says "Inkscape SVG (*svg)". Rename the file to whatever you want, double check that you know where you are saving it to (I always use desktop for fast finding) and click ok. That's it! Now you can import your SVG file to SCAL or use it however you need to.
 |
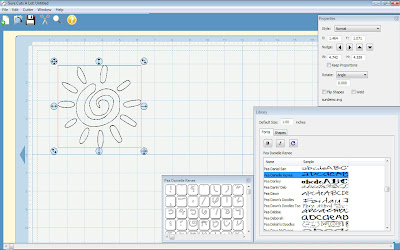
| Here is my image imported (and cut-able!) in SCAL. (I have v.1) |
There you have it, easy peasy lemon squeezy. Now go download Inkscape and try it out for yourself. Even if you don't have a place to use an SVG file just yet.


Do you have SCAL 2? You can actually trace an image right in SCAL without having to use Inkscape. Love that feature!
ReplyDeleteI actually only have SCAL 1. But its better than no SCAL :) Too bad its not still available for Cricut use - Inkscape has a big learning curve (in my opinion) Thanks for sharing Jill!
ReplyDelete